Power Bowl

IMG_5365

AKA Bowl of EVERYTHING I LOVE. Which results in this being a dinner that I make over and over. And over.

IMG_5364IMG_5369

Also, this is probably the healthiest thing ever.  Boiled: eggs and broccoli.  Pan fried: mushrooms.  Roasted: sweet potato.  And the only seasoning you really need is salt and pepper.

Power Bowl
2 servings

1 small sweet potato, cut into 1-inch chunks
2 eggs
1/2 small head broccoli, chopped
1 cup chopped white mushrooms
salt and pepper
dried basil (optional)
soy sauce (optional)
olive oil

1. Drizzle olive oil unto a baking sheet. Add chopped sweet potato and bake at 400 degrees F for 30-40 minutes until soft, frequently stirring to flip the sides of sweet potato. After baking time, remove and season with salt, pepper, and basil.
2. Meanwhile, boil 2 eggs. In another pot, boil water and add broccoli. Remove from heat and drain broccoli after 3-4 minutes, until crisp-tender. Heat a pan to medium-high and grease with olive oil. Add mushrooms and let sizzle, stirring occasionally. Continue cooking until all the moisture evaporates and the mushrooms start to golden, about 5 minutes. Season with salt and pepper, add a splash of soy sauce at end of cooking for flavor, if desired.
3. Assemble sweet potato, broccoli, mushrooms, and egg in a bowl and enjoy!


Deconstructed Turkey Burger

… or I guess I should say half-way deconstructed?  Deconstructing food means taking the ingredients apart and then putting them back in a new/unusual way.  But I just took the individual ingredients and put them in separate piles on the plate.  I can chalk it up to laziness, no creativity, or the pure lack of time and an empty stomach.  (Spoiler alert: it was all three.)

edits (1 of 2)

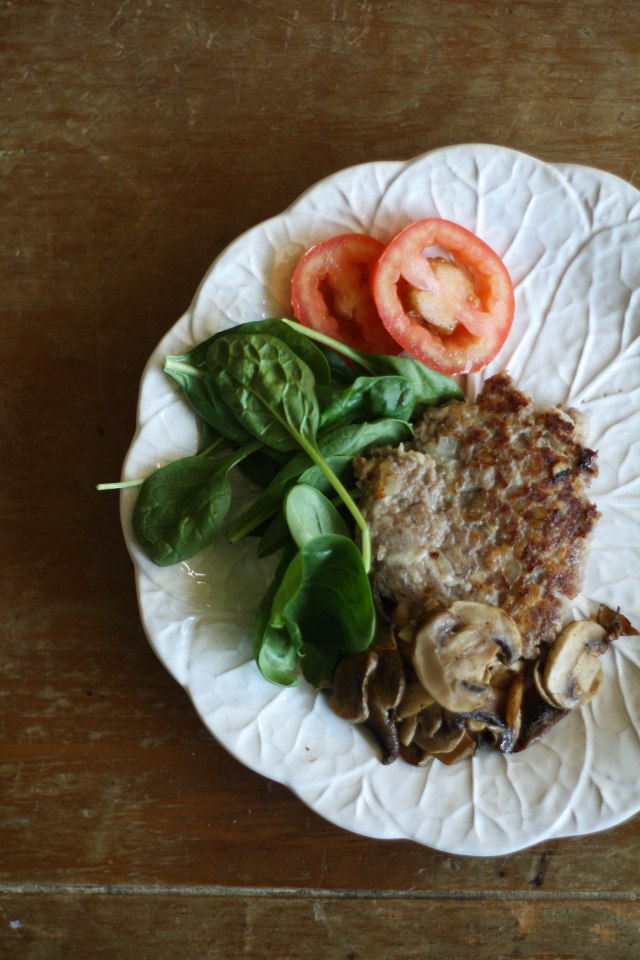
Our line-up includes ground turkey with cheese and zesty lime juice, a sweet tomato, spinach, and super flavorful mushrooms.

edits (2 of 2)

I love this plate because it’s a game of mix-and-match.  You can eat a bit of everything in one bite, or you can chose to leave out some flavors.

IMG_5353

The burger is SO juicy and packed with flavor.  This is a favorite, easy meal that I repeat often, throwing whatever ingredients I have on had around the burger.  Today it was mushrooms, spinach, and tomato, but I have done a variety of beans, avocado, red onion etc!

Turkey Burger

4 servings

1 teaspoon lime or lemon juice
1 1/4 pounds ground turkey
1 cup cheddar cheese (but let’s be honest, I just whatever cheese I have in the fridge. Usually it’s mozzarella, today it was parmesan.)
1/4 onion, diced
1 tomato, sliced
2 1/2 cups spinach
1 cup white mushrooms, sliced

1. Combine turkey, citrus juice, cheese, and onion in a medium bowl. Mix until all ingredients are just combined.
2. Form mixture into 4 3/4 inch-thick patties. Cook on a pan heated to medium-high until cooked through, flipping half way.
3. Meanwhile, heat a separate pan over medium-high heat and grease with oil. Add sliced mushrooms, season with salt and pepper. Let cook until golden-brown and tender.
4. Arrange pattie, spinach, tomato, and mushroom on plate. Enjoy!

TONKATSU (Pork Cutlets)

College is great for many reasons, one being that there always seems to be an event with free food, or friends who invite you over to eat.  This translated into me barely cooking these past few weeks which was quite exciting at first… especially for the grocery bill.  But then I started to miss it.

IMG_5265

So we’re back at it with TONKATSU. Not only is it a fried pork cutlet, it’s Japanese. Double win. I’ve had it since I was little (thanks mom) but when I was in Japan for a year and a half, it was so fun to see my companions eat it for the first time and fall in love. In one area we would buy lunch once a week and my companion chose this every single time. She loved it too much to risk trying anything else.

IMG_5266IMG_5267

TONKASTU

4 servings

4 pieces pork loin chops, thinly sliced
pinch of salt and pepper
flour, as needed
2 beaten eggs
2 cups bread crumbs
frying oil, as needed
tonkatsu sauce

1. To make the pork more tender, pound out the meat a little bit, and then form it back into it’s shape.
2. Season each side of the pork with salt and pepper
3. Dredge each piece of pork in flour, dip both sides into the beaten eggs, and then coat with breadcrumbs.
4. Heat a large skillet with about 1/2 inch of oil until hot, then put the pork in. Fry until golden brown, turning once and heating all the way through.
5. Place on paper towels to let the oil drip off, cut into pieces, and eat!

Extreme Omelettes

IMG_4833
I was slightly embarrassed as I started writing because I realized that I still can’t spell ‘omelettes’ without auto-correct. Please tell me I’m not the only one. IMG_4830
But, before we get to the omelette, we must speak of serious matters. Namely, this past Valentine’s Day weekend. This holiday has become one of my favorites, just because it’s a great excuse to show love to everyone. The giving is my favorite part. So here’s a little snippet of how my weekend went:

•watercolor valentines were delivered to friends with some dark chocolate short-bread cookies (and taped to the door when they weren’t home)
•YA romance novels were checked out from the library
•churro waffles with fried ice cream and dulce de leche was quickly devoured
•a new watercolor project was started
•deer was spotted and unsuccessfully chased after
•and, of course, the girls gathered, ate lots of chocolate, and practiced our closed mouth smiles

All this goodness started with these omelettes. My theory is to stuff as much in an omelette as one can. It usually works great every time until the whole flipping part happens. And then in some cases it turns into extreme scrambled eggs. However, I used restraint this time so we ended up with the real deal. This is loaded with mozzarella cheese, tomato, and spinach, as well as diced onions, mushrooms, and asparagus that’s cooked in with the egg. It’s so good, you’ll be having breakfast for dinner everyday.

Extreme Omelettes
1 serving

olive oil or butter
1/4 small onion, chopped
3 white mushrooms, chopped
2 stalks asparagus, chopped
2 eggs
dash of salt and pepper
1/4 tomato, chopped
handful of spinach
sprinkle of mozarella cheese

1. Heat olive oil or butter in a pan over medium heat. Add onion, mushrooms, and asparagus. Sautee for about 3 minutes, until soft.
2. Beat two eggs and add to pan. Gently push egg mixture towards the middle, letting all parts of the egg cook. Sprinkle in salt and pepper.
4. Add spinach, tomato, and cheese to one side of the omelette. Carefully flip the omelette over. And you’re done!

Slow-Cooker Vegetarian Split Pea Soup

Let February 5, 2016 forever be marked in history. The day I dragged the unopened crock pot out from under my bed and used it for the first time. After chopping the vegetables and dumping everything in the crock pot, I left the apartment for my humanities class praying that the apartment wouldn’t be burned to oblivion when I got back.

IMG_4749

The good news is that the only thing it did was turn these rock-hard dried split peas into mushy goodness.

Also, the load of vegetables will leave you feeling healthy for days.

IMG_4770
Cheese croutons… it doesn’t get any better

IMG_4775

This soup has some serious deep flavor and it infinitely better than the kind that comes out of the can.  Try it out!

Slow-Cooker Vegetarian Split Pea Soup
from The Kitchn // makes 4 servings

1 pound dried green split peas
1 small onion, chopped
2 medium carrots, peeled and diced
2 celery stalks, diced
2 tablespoons olive oil
2 bay leaves
1 teaspoon salt
Freshly ground black pepper
6 cups water

1. Place the split peas in an even layer in the insert of a slow cooker. Add the onion, carrot, celery, oil, bay leaves, salt, and season with pepper. Add the water (no need to stir), cover, and cook until the peas are soft, 5 to 6 hours on high or 8 to 10 hours on low.

2. Stir the soup to incorporate the peas and broth, taste, and season with salt and pepper as needed.  Done!


Baked Eggs with Spinach and Mushrooms

IMG_4553
Disclaimer: this dish is ten times more delicious than it looks. I blame the unnatural lighting.

Last week my roommate was pan-frying mushrooms with olive oil and thyme.  This resulted in 1.) me lingering around the kitchen just to savor the smell and 2.) the realization that I never, ever use mushrooms to cook.  Fast-forward a few days and here I am, with a carton of mushrooms taking up the precious fridge space.  So proud.

I am awful at describing what things taste like because I just say it’s all just good and that’s the only thing that matters.  But, this was extra special.  Because it’s so healthy and wholesome, but has such a deep taste.  I am now deeply converted to mushrooms.

IMG_4556

So, go pull your cast-iron skillet pan out and feel fancy making baked eggs with mushroom and spinach for brunch.

Baked Eggs with Spinach and Mushrooms

From Smitten Kitchen // makes 12 portions

2 pounds (32 ounces) ounces fresh baby spinach or regular spinach leaves
1 small yellow onion, finely chopped
3 small garlic cloves, minced
4 tablespoons unsalted butter
1 pound mushrooms, thinly sliced
1 cup heavy cream
3/4 teaspoon table salt
Freshly ground black pepper
1/4 teaspoon freshly grated nutmeg (optional)
12 large eggs
6 tablespoons finely grated Parmesan cheese

1. Bring 1/2 inch water to a boil in a very large ovenproof heavy skillet, then add half of spinach and cook, turning with tongs, until wilted, about 30 seconds. Add remaining spinach and wilt in same manner, then cook, covered, over moderately high heat until spinach is tender, about 1 to 2 minutes. Drain in a colander and cool under cold running water. Gently squeeze handfuls of spinach to remove as much liquid as possible, then coarsely chop. You will have about 2 cups fairly tightly packed cooked spinach.

2. Wipe skillet dry, then melt butter over medium-low heat. Cook onion and garlic until softened, 2 to 3 minutes. Add mushrooms and increase heat to medium-high, then cook, stirring, until mushrooms have softened, exuded liquid and that liquid has cooked off, about 5 minutes. Stir in cream, salt, pepper, nutmeg (if using), and chopped spinach and bring back a simmer. Remove skillet from heat.

3. If baking eggs in this skillet, make 12 large indentations in mixture, each large enough to fit an egg. Otherwise, you can transfer this mixture to a 9×13-inch baking dish and do the same there.

4. When you’re ready to bake the dish, or about 30 minutes before serving, put oven rack in upper third of oven and heat oven to 450°F. Crack an egg into each well. Bake until whites are firm and yolks are still runny. You can check this by inserting a toothpick into various parts of the eggs and seeing whether they’re runny or set, which takes anywhere from 15 to 30 minutes. The range is long due to different ovens and baking vessels. It’s better to have to check more often than to let them overcook.

Sweet and Sour Chicken

sweet and sour (1 of 1)

Sweet and tangy. I’m pretty sure this type of chicken is what keeps food courts across the country in business, because it’s what the taste buds are made for. But I avoid these like the plague at the food court because even just eating a sample makes me feel like I just ate something greasy and unnatural and I should avoid eating in general for the next day to make up for it.

IMG_4531b

This chicken, on the other hand, is full of goodness covered in a mix of sugar and vinegar, among other things, so it turns into sweet and sour goodness coming out of YOUR OWN OVEN. Sweet and sour chicken is, to me, something that sounds hard to make…but it’s so easy! So eat chicken and be merry. The end.

IMG_4533

Baked Sweet and Sour Chicken

From Mel’s Kitchen Cafe // Makes 4-6 servings
Chicken:
3-4 boneless, skinless chicken breasts (about 2 pounds)
Salt and pepper
1 cup cornstarch
2 large eggs, beaten
1/4 cup canola, vegetable or coconut oil
Sauce:
1/2 to 3/4 cup granulated sugar (depending on how sweet you want the sauce)
4 tablespoons ketchup
1/2 cup apple cider vinegar
1 tablespoon soy sauce
1 teaspoon garlic salt
1. Preheat the oven to 325 degrees F.
2. Cut the chicken breasts into 1-inch pieces. Season with salt and pepper. Place the cornstarch in a gallon-sized ziploc bag. Put the chicken into the bag with the cornstarch and seal, tossing to coat the chicken.
3. Whisk the eggs together in a shallow pie plate. Heat the oil in a large skillet over medium heat until very hot and rippling. Dip the cornstarch-coated chicken pieces in the egg and place them carefully in a single layer in the hot skillet.
4. Cook for 20-30 seconds on each side until the crust is golden but the chicken is not all the way cooked through (this is where it’s really important to have a hot skillet/oil). Place the chicken pieces in a single layer in a 9X13-inch baking dish and repeat with the remaining chicken pieces.
5. Mix the sauce ingredients together in a medium bowl and pour over the chicken. Bake for one hour, turning the chicken once or twice while cooking to coat evenly with sauce. Serve over hot, steamed rice.
P.S. Props to my twin Annie for actually making this while I dashed home from the library.

Cashew Chicken Lettuce Wraps

I’m back from a year and a half in Japan, yet I bring to you cashew chicken lettuce wraps.  Not exactly the most Japanese dish.  But, I snagged the recipe from a site I love, and I guess it makes sense that coming back to home would mean coming back to old habits and beloved cooking blogs.  But don’t worry, the Japanese recipes will be coming sooner or later!  But for now: cashews and chicken.

The lettuce is crisp, the tomatoes fresh, and the cashews bring in a nice, deep flavor.  Then add the chicken, soy sauce, syrup, onions, carrots, and garlic and it’s… gone in five minutes.  But the good news is that it takes not much longer than that to prepare.

Cashew Chicken Lettuce Wraps

from Mel’s Kitchen Cafe/makes 4 servings
  • 1 tablespoon olive oil
  • 1/2 cup finely diced yellow or white onion
  • 1 cup finely diced (or shredded) carrots
  • 3-4 cloves garlic, finely minced or pressed through a garlic press
  • 1/4 teaspoon salt
  • 1/4 teaspoon black pepper
  • 1 pound boneless, skinless chicken breasts or chicken thighs, cut into small pieces
  • 3 tablespoons low-sodium soy sauce
  • 2 tablespoon pure maple syrup *I substituted honey in for syrup
  • 1/2 cup chopped raw cashews (lightly toasted, if desired)
  • Bibb or green leaf lettuce leaves for wrapping
  • Chopped cucumbers and tomatoes for serving
  1. In a large 12-inch nonstick skillet, heat the oil over medium heat and add the onion and carrots. Add the garlic, salt and pepper and cook for 2-3 minutes, until the vegetables start to soften.
  2. Season the chicken pieces lightly with salt and pepper and add to the skillet with the onions and carrots. Cook, stirring often, until the chicken pieces are cooked through, 4-5 minutes.
  3. Stir in the soy sauce and maple syrup and cook over medium heat for 2-3 minutes, letting the soy sauce and maple syrup bubble and simmer.
  4. Stir in the cashews, cooking until they are just heated through. Season to taste with additional salt and pepper, if needed.
  5. Serve in lettuce leaves topped with tomatoes and cucumbers

Bye for 18 months…

IMG_6284

The twin and I are off to serve an 18 month mission for our church in Japan! We’re so excited to serve The Lord and try to spread some happiness around. And for the Japanese food, of course.

Since I’ll be fully focused on missionary work, I won’t be able to post until I get back! But it’s worth it, because I’ll come back posting the best Japanese dishes ever.

See you in a year and a half!

Black and White Chocolate Chip Cookies

IMG_4339

You get the best of both worlds with this cookie. My sister came up with the perfect way to eat it: take a bite of the light side, take a bite of the dark side, and then take a bite with both sides.

IMG_4328

IMG_4355

This is the easiest chocolate chip cookie recipe. There are a million different versions out there, but I have stuck to this one for years, and that’s because it’s the best. It’ll give you cookies that are crispy on the edges and soft and chewy in the center. And they’re not flat (I mean, who wants a flat, thin cookie?!) To make them black and white, I just split the completed dough in two different bowls and mixed in cocoa powder in one of the halves at the very end. So easy and they look so cool.

IMG_4323

IMG_4320

[Makes about three dozen cookies]
1 1/2 sticks butter, softened
1 cup brown sugar
3/4 cup granulated sugar
2 eggs
1 teaspoon vanilla extract
3 cups flour
3/4 teaspoon baking powder
3/4 teaspoon baking soda
1/2 teaspoon salt
2 cups chocolate chips
1/4 cup cocoa powder *optional

1. Preheat oven to 350 degrees F. Beat together softened butter and both sugars on medium until light and fluffy, about three minutes.
2. Beat in eggs, one at a time. Add vanilla.
3. Mix in flour, baking powder and soda, and salt until just incorporated. Fold in chocolate chips.
4. If making black and white cookies, place half of dough in another bowl and mix in 1/4 cup cocoa powder.
5. Scoop the dough into tablespoon-sized balls and place on greased cookie sheet. If making black and white cookies, take 1/2 tablespoon of light dough and 1/2 tablespoon of dark dough. Press together to make a single ball. Bake for 8-10 minutes. Cool on baking sheet and store in airtight container for several days.